Launching LiveCDs with VMWare
Maybe some of you have already heard about VMware. But what is VMWare?
Very Briefly: It's a software which is able to virtualize another OS within the running OS. If you want to know more about what VMWare is, here you can find further information.
But my goal today is not to explain the details of VMWare, but to provide you some help on the install of the VMPlayer and to show you one nice way to use it:
with VMPlayer it is possible to test liveCDs without burning them.
The steps are as following:
1) Prepare your system
2) Install VMPlayer
3) Download a *.iso-File of a liveCD
4) Create a *.vmx-File in order to
5) Launch the liveCD with Vmplayer
First step: Prepare your system
There are some things you need to take care of before installing VMPlayer: the development header files for your running kernel, the build essential tools and the gcc-3.4 compiler. To install them open a konsole and type
If ever you have problems with this step, check your sources.list.
Maybe you noticed that you already have gcc 4.0 installed on your system. So why do we have to install gcc 3.4? The answer is easy: the default compiler on breezy is gcc 4, but the kernel has been compiled with gcc 3.4. VMPlayer needs the compiler which has been used for the kernel, that's why 3.4 is required. But only installing gcc 3.4 isn't enough: we need to tell the system where to find the needed version of gcc. You can do this just by typing into the konsole:
(As long as the actual konsole is open, your system will use gcc 3.4. So if you close it before installing VMPlayer, and you open a new konsole, you need to retype this command).
Second step: Install VMPlayer
Luckily for all of us, VMPlayer is Freeware (sadly not OpenSource, but nothing's perfect). You can just download it from www.vmplayer.com. (Of course you could also download VMWareWorkstation - but you will only get a 30-day-eval version after entering your name, email, telephone number and so on.. - so better stick to VMPlayer only for the moment). Make sure you download the *.tar file (the download may take a while since the file is about 34MB).
Save the download in a directory of your choice (e.g. /home/username/apps). Open a konsole and cd into the directory. There you untar the file:
A new directory will be created. To install VMPlayer, cd into the directory
and execute the install file:
VMplayer will ask you some questions - I think it's safe to hit enter / say "yes" to all of the questions (for me everything worked fine).
Third step: Download a *.iso-File of a liveCD
Now we need a liveCD.iso. I really want to see how Dapper will be, and that's why I'm downloading Flight CD 4. If you want to do so, here you can find the *.iso which suits for you. (I recommend to download DapperliveCD via torrent, it's pretty fast). Save the *.iso into a directory of your choice.
Forth step: Create a *.vmx-File
The problem is: VMPlayer can't launch *.iso files directly. You need first to create *.vmx file. Doing this is easy, because you can make it online with VMBuilder.
Here is my configuration (it may differ slighty e.g. the directory and the name of your iso, you can choose another name for the file etc.) I enable Ethernet because I want to try out the internet-access too, but you are not obliged to do so.
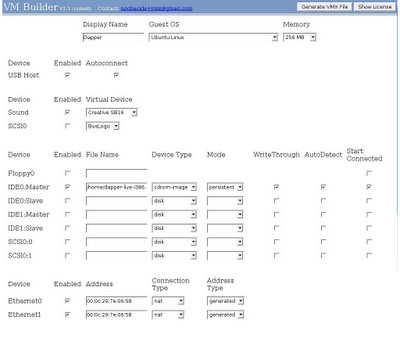
When you're finished, just click on "Generate VMX File". Copy the output of the following page into an editor (e.g. kate) and save the file as name.vmx (e.g. dapper.vmx).
Fifth step: Launch the liveCD with Vmplayer
Open your konsole and type
VMPlayer will launch and open a window "Open Virtual Machine". Here you can open your *.vmx file (in my case: dapper.vmx). If the *.vmx file is well created (meaning: you put the right path to your iso-file and a correct configuration) it will launch the live-cd in a new window. You can even maximize the window to a full screen in order that you have the perfect virtualization of your liveCD. (If you want to exit the fullscreen-mode press ctrl+alt).
If you want to learn more about VMPlayer on Ubuntu, read the wikipage.
Thanx to ChitleshGoorah for inspiration and help :-)
Very Briefly: It's a software which is able to virtualize another OS within the running OS. If you want to know more about what VMWare is, here you can find further information.
But my goal today is not to explain the details of VMWare, but to provide you some help on the install of the VMPlayer and to show you one nice way to use it:
with VMPlayer it is possible to test liveCDs without burning them.
The steps are as following:
1) Prepare your system
2) Install VMPlayer
3) Download a *.iso-File of a liveCD
4) Create a *.vmx-File in order to
5) Launch the liveCD with Vmplayer
First step: Prepare your system
There are some things you need to take care of before installing VMPlayer: the development header files for your running kernel, the build essential tools and the gcc-3.4 compiler. To install them open a konsole and type
sudo apt-get install linux-headers-$(uname -r)
sudo apt-get install build-essential
sudo apt-get install gcc-3.4 g++-3.4
If ever you have problems with this step, check your sources.list.
Maybe you noticed that you already have gcc 4.0 installed on your system. So why do we have to install gcc 3.4? The answer is easy: the default compiler on breezy is gcc 4, but the kernel has been compiled with gcc 3.4. VMPlayer needs the compiler which has been used for the kernel, that's why 3.4 is required. But only installing gcc 3.4 isn't enough: we need to tell the system where to find the needed version of gcc. You can do this just by typing into the konsole:
export CC=/usr/bin/gcc-3.4
(As long as the actual konsole is open, your system will use gcc 3.4. So if you close it before installing VMPlayer, and you open a new konsole, you need to retype this command).
Second step: Install VMPlayer
Luckily for all of us, VMPlayer is Freeware (sadly not OpenSource, but nothing's perfect). You can just download it from www.vmplayer.com. (Of course you could also download VMWareWorkstation - but you will only get a 30-day-eval version after entering your name, email, telephone number and so on.. - so better stick to VMPlayer only for the moment). Make sure you download the *.tar file (the download may take a while since the file is about 34MB).
Save the download in a directory of your choice (e.g. /home/username/apps). Open a konsole and cd into the directory. There you untar the file:
tar zxvf VMware-player-*.tar.gz
A new directory will be created. To install VMPlayer, cd into the directory
cd vmware-player-distrib/
and execute the install file:
sudo ./vmware-install.pl
VMplayer will ask you some questions - I think it's safe to hit enter / say "yes" to all of the questions (for me everything worked fine).
Third step: Download a *.iso-File of a liveCD
Now we need a liveCD.iso. I really want to see how Dapper will be, and that's why I'm downloading Flight CD 4. If you want to do so, here you can find the *.iso which suits for you. (I recommend to download DapperliveCD via torrent, it's pretty fast). Save the *.iso into a directory of your choice.
Forth step: Create a *.vmx-File
The problem is: VMPlayer can't launch *.iso files directly. You need first to create *.vmx file. Doing this is easy, because you can make it online with VMBuilder.
Here is my configuration (it may differ slighty e.g. the directory and the name of your iso, you can choose another name for the file etc.) I enable Ethernet because I want to try out the internet-access too, but you are not obliged to do so.

When you're finished, just click on "Generate VMX File". Copy the output of the following page into an editor (e.g. kate) and save the file as name.vmx (e.g. dapper.vmx).
Fifth step: Launch the liveCD with Vmplayer
Open your konsole and type
vmplayer
VMPlayer will launch and open a window "Open Virtual Machine". Here you can open your *.vmx file (in my case: dapper.vmx). If the *.vmx file is well created (meaning: you put the right path to your iso-file and a correct configuration) it will launch the live-cd in a new window. You can even maximize the window to a full screen in order that you have the perfect virtualization of your liveCD. (If you want to exit the fullscreen-mode press ctrl+alt).
If you want to learn more about VMPlayer on Ubuntu, read the wikipage.
Thanx to ChitleshGoorah for inspiration and help :-)
posted by Mimi at
2/22/2006 02:10:00 PM
![]()
![]()

2 Comments:
The best guide ever on how to sucessfully install VmWare Player!!
By Anonym, at 9/13/2006 09:08:00 PM
Happy you like it! You can also visit my new blog at http://zerlinna.blogweb.de
:-)
Zerlinna
By Mimi, at 9/13/2006 09:13:00 PM
Kommentar veröffentlichen
<< Home