Install another operating system within your Kubuntu (not dual boot)
Maybe you already tried out my latest post about Qemu or Vmplayer. That was only launching of LiveCDs, but now we go a little further: you can install a complete Operating System WITHIN your Kubuntu Breezy! What you need is:
--> Hard Disk Space (minimum 2GB)
--> Install Disc of another system (another Linux or even Windows, I take linspire as an example. Of course if you take another OS, just replace every "linspire" in this post with the name of the OS you choose)
--> Qemu and Kqemu (Script)
You may wonder what Kqemu is. If you tested to launch LiveCDs you probably noticed how SLOW it is. If you didn't: believe me, it IS really slow. So we need an accelerator: Kqemu (unfortunately not open source, but at least freeware).
If you installed Qemu with apt-get you may encounter little problems to install Kqemu because there's no .deb available.
But some nice guy has created a little script for us. I just changed it a little bit in order you can use the latest version of qemu. Grab the script (with rightclick --> save as) here and save it into a directory of your choice. Then type the following into your konsole:
This will install qemu and kqemu on your system as a .deb file, meaning: you can easily remove it later.
If ever you get error messages read them carefully. If you don't find a solution you can contact me, or even better the original author of the script. You can also open the script with kate (rightclick --> open with kate) and see yourself what causes the error.
Now you've succeeded in installing Qemu and Kqemu, create a new directory for your new OS and cd into it (of course you can make this directory wherever you want, I just made it in my home folder).
Then create the virtual image for the system:
Of course you are not obliged to take 5GB. I think 2GB are far enough for Linspire (even for windows I think). I just take 5GB because my HDD is half empty :-)
Note: Even if you take 10GB this does NOT mean that the image does really HAVE the size of 10GB. It just means that your new system is limited up to 10GB - if the new sytem takes only 1,2 GB also the image will only be at 1,2GB.
You've created the image? Fine, now let's install linspire (or whatever OS you chose!).
Put in the install CD and type into your konsole (all in one line without break):
"-user -net" is important to have internet access within your new system. "-m 196" is the Set virtual RAM size (megabytes), default is 128 MB, I chose 196.
If you get the message: Could not open '/dev/kqemu' - QEMU acceleration layer not activated then close the qemu window and type into your konsole
Retype the install command (qemu -cdrom.. - see above)
Still got the error message? Close qemu again.
Then type:
The part "2.6.12-10-386" may vary, depending on your kernel. Just have a look at the directory /lib/modules - if you got more than one directory there, cd into each to see where you can find the /misc directory. This should be the right one then!
Done this, the install command above should work now.
The install may take some time. After the install, qemu will try to boot the new OS itself. Maybe this may fail (was the case for me) - but don't worry. If that happens: just close the qemu window and type the following command into your konsole to launch your new OS:
Now enjoy!
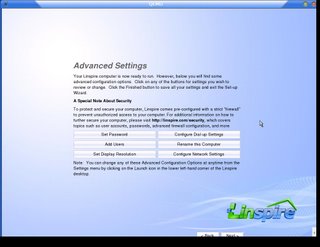
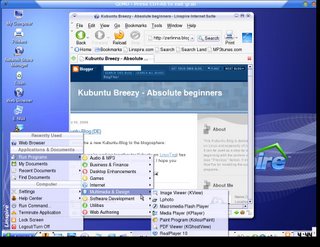
Some screenshots of my linspire within kubuntu (you can see it's only a window within my system):
Even internet works fine! :D
--> Hard Disk Space (minimum 2GB)
--> Install Disc of another system (another Linux or even Windows, I take linspire as an example. Of course if you take another OS, just replace every "linspire" in this post with the name of the OS you choose)
--> Qemu and Kqemu (Script)
You may wonder what Kqemu is. If you tested to launch LiveCDs you probably noticed how SLOW it is. If you didn't: believe me, it IS really slow. So we need an accelerator: Kqemu (unfortunately not open source, but at least freeware).
If you installed Qemu with apt-get you may encounter little problems to install Kqemu because there's no .deb available.
But some nice guy has created a little script for us. I just changed it a little bit in order you can use the latest version of qemu. Grab the script (with rightclick --> save as) here and save it into a directory of your choice. Then type the following into your konsole:
cd /yourdirectory
chmod a+x insQEMU_v080.sh
sudo ./insQEMU_v080.sh
This will install qemu and kqemu on your system as a .deb file, meaning: you can easily remove it later.
If ever you get error messages read them carefully. If you don't find a solution you can contact me, or even better the original author of the script. You can also open the script with kate (rightclick --> open with kate) and see yourself what causes the error.
Now you've succeeded in installing Qemu and Kqemu, create a new directory for your new OS and cd into it (of course you can make this directory wherever you want, I just made it in my home folder).
mkdir /home/username/vm
cd /home/username/vm
Then create the virtual image for the system:
qemu-img create -f qcow linspire.qcow 5G
Of course you are not obliged to take 5GB. I think 2GB are far enough for Linspire (even for windows I think). I just take 5GB because my HDD is half empty :-)
Note: Even if you take 10GB this does NOT mean that the image does really HAVE the size of 10GB. It just means that your new system is limited up to 10GB - if the new sytem takes only 1,2 GB also the image will only be at 1,2GB.
You've created the image? Fine, now let's install linspire (or whatever OS you chose!).
Put in the install CD and type into your konsole (all in one line without break):
qemu -cdrom /dev/cdrom -hda linspire.qcow -boot d -net nic -net user -m 196 -localtime(make sure before you're in your vm directory)
"-user -net" is important to have internet access within your new system. "-m 196" is the Set virtual RAM size (megabytes), default is 128 MB, I chose 196.
If you get the message: Could not open '/dev/kqemu' - QEMU acceleration layer not activated then close the qemu window and type into your konsole
modprobe kqemu
Retype the install command (qemu -cdrom.. - see above)
Still got the error message? Close qemu again.
Then type:
sudo rmmod kqemu
sudo insmod /lib/modules/2.6.12-10-386/misc/kqemu.ko
The part "2.6.12-10-386" may vary, depending on your kernel. Just have a look at the directory /lib/modules - if you got more than one directory there, cd into each to see where you can find the /misc directory. This should be the right one then!
Done this, the install command above should work now.
The install may take some time. After the install, qemu will try to boot the new OS itself. Maybe this may fail (was the case for me) - but don't worry. If that happens: just close the qemu window and type the following command into your konsole to launch your new OS:
qemu linspire.qcow -boot c -net nic -net user -m 196 -localtime
Now enjoy!
Some screenshots of my linspire within kubuntu (you can see it's only a window within my system):

Even internet works fine! :D

posted by Mimi at
3/10/2006 04:05:00 PM
![]()
![]()

4 Comments:
The link to the script doesn't work...
Also, there is a typo in the user net command...
By Anonym, at 3/21/2006 11:31:00 PM
The link to the script DOES work - you just have to grab it with Rightlick --> save target as... (and not with a direct mouseclick) like I've described it beyond.
For the typo you're right, thank you (of course it's corrected now).
By Mimi, at 3/22/2006 10:59:00 AM
Actually, the link doesn't work--I don't know what language the error is, but the file seems to have been removed from wherever you were hosting it. (And I did the right-click method, I ended up with the webpage showing the 403 error downloaded.)
By Anonym, at 4/24/2006 01:13:00 AM
Last time I checked it did with the rightlick. But the direkt link never worked, I think it may be some kind of protection of the uni-site, so I changed the filename slightly in order to improve.
Feel free to try again ;)
By Mimi, at 4/24/2006 09:03:00 AM
Kommentar veröffentlichen
<< Home